How Microsoft Project Calculates Durations in Days

Microsoft Project effectively records task durations in hours and the value of the duration in days is calculated using the parameter entered in the Hours per day: field in the File, Options, Schedule tab, Calendar options for this project: section. It is VERY IMPORTANT that all users understand that the durations in days are calculated using ONLY the one parameter and this parameter is used with EVERY calendar. This makes Microsoft Project difficult to use when calendars with a different number of hours per day are being used.
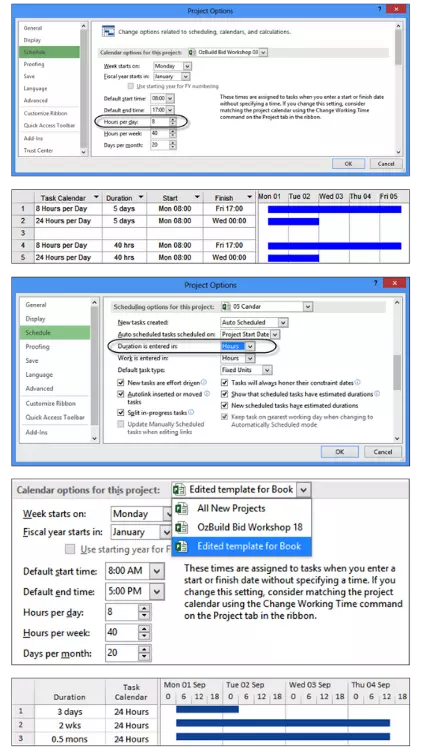
For example, the Options form below shows the Hours per day: as “8”. Therefore, when tasks are:
- Assigned an 8-hours per day calendar then the durations in days will be correct, and
- Assigned a 24-hours per day calendar the durations of tasks in days will be misleading.
The picture on the right shows:
- Task 1 has the correct duration in days.
- Task 2 shows a duration that is clearly misleading.
- Task 4 and 5 display the duration in hours and are not misleading when the calendar column is also displayed.
It is STRONGLY RECOMMENDED that inexperienced users avoid changing calendar start and finish times or assigning calendars with different numbers of hours per day whenever possible.
To display the duration in hours:
- The Duration is entered in: field in the File, Options, Schedule tab, Schedule heading should be set to Hours, and then
- Existing durations in days are changed to hours by overtyping the original durations.
The File, Options, Schedule, Calendar options for this project options are explained in more detail below:
The title of these options does not clearly indicate their functionality. Options for Hours per day:, Hours per week: and Days per month: SHOULD be understood, especially if multiple Task calendars are used.
- This heading allows the setting of the default for All New Projects or for individual projects. This sets the current calendar settings as the default in the Global.mpt project and is used thereafter as the calendar settings in all new projects.
- Week starts on: – Sets the first day of the week. This is the day of the week that is displayed in the timescale. This setting affects the display of the calendar in the Change Working Time form. NOTE: This is best set to Monday and not Sunday so the date displayed in a weekly timescale is a working day.
- Fiscal year starts in: – A month other than January may be selected as the first month of the fiscal year for companies that want to schedule projects using their financial years.
- Use starting year for FY numbering – This option becomes available when a month other than January is selected as a Fiscal year starts in:. The year in the timescale may be assigned as the year that the fiscal starts or the year that the fiscal year finishes.
- Default start time: – This is the time of day that tasks are scheduled to start when a start date constraint (without a time) is applied. It is also the default time for an Actual Start when an Actual Start (without a time) date is entered.
- Default end time: – This is the time of day that tasks are scheduled to finish when a finish date constraint (without a time) is entered. It is also the default time for an Actual Finish when an Actual Finish date (without a time) is entered.
It is essential to match both the Default start time: and Default end time: with your project calendar’s normal start and finish times. For example, when the Default start time: is set earlier than the calendar normal start time, a task set with a constraint without a time will appear to finish one day later than scheduled. Therefore a one-day task will span two days and a two-day task, three days.
The following options need to be understood as they affect how summary durations are displayed. NOTE: THESE OPTIONS ARE IMPORTANT. Microsoft Project effectively calculates in hours. Task durations may be displayed in days, weeks and months. These summarized durations are calculated based on the parameters set in Options, Calendar. These options work fine when all project calendars are based on the same number of work hours per day. When tasks are scheduled with calendars that do not conform to the Options, Calendar settings (e.g., when the Options, Calendar settings are set for 8 hours per day and there are tasks scheduled on a 24-hour per day calendar), the results often create confusion for new users.
-
Hours per day: – This setting is used to convert the duration in hours to the displayed value of the duration in days. For example, a task entered as a 3-day duration and assigned a 24-hour per day calendar will be displayed in the bar chart as 1-day elapsed duration. This bar chart duration is 1/3 of the duration value since each day is an 8-hour equivalent on a 24-hour calendar and the output is not logical. See Task 1 on the right.
-
Hours per week: – This setting is used to convert the calendar hours to the displayed duration in weeks. For example, a task entered as 2 weeks (10 working days) and assigned a 24-hour per day calendar is displayed with a 3-day and 6-hour duration in the bar chart. This is 1/3 of the “normal” duration and again not logical. See Task 2 on the right.
-
Days per month: – This option is used to convert the displayed task duration from days to months. For example, a 0.5-month task (10 working days) on a 24-hour per day calendar is displayed as a 3-day and 6-hour duration in the bar chart and again is not logical. See Task 3 on the right.
All the durations displayed in the picture are misleading. It is important that this situation be avoided.
Other scheduling software also exhibits the time conversion problem when using multi-calendars. This display can lead to a great deal of confusion. To avoid confusion when using multi-calendars, it is suggested that you only display durations in hours.
Jump To Section

Earn As You Learn
Earn 25% commission when your network purchase Uplyrn courses or subscribe to our annual membership. It’s the best thing ever. Next to learning,
of course.
Display Times in 24-Hour Clock
Should you wish to display your times in 24-hour format, e.g. 17:00hrs instead of 5:00pm then:
- Select from the windows menu Control Panel, Region tab, or similar commands if you are not using Windows 8;
- Select Formats, select the Short Time & Long Time tab and
- Change the time format from h:mm:ss tt to HH:mm:ss or H:mm:ss
Working with Calendars with Different Hours per Day
There are some workable options to ensure that the durations in days are calculated and/or displayed correctly:
- All the calendars used on a project schedule should have the same number of hours per day for each day. This value is entered in the Hours per day: field in the Options form on the right. Then all durations in days will calculate correctly.
- When there is a requirement to use a different number of hours per day (in either the same calendar or in different calendars) then all durations should only be displayed in hours and the Task Calendar displayed, as per the picture on the right. Two examples of how this may occur are when:
- There is an 8-hour working day Monday to Friday and a 4-hour working day on Saturday, or
- Different calendars are required on a project, for example when some tasks are assigned an 8-hour per day calendar and some a 24-hour per day calendar.
- The Duration is entered in: field in the File, Options, Schedule tab, Scheduling options for this project section should be set to Hours.
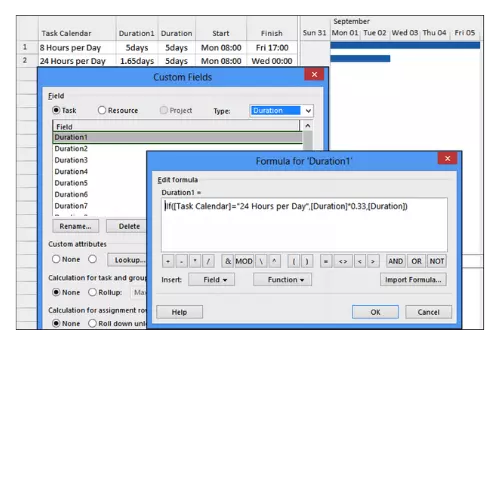
- A Customized Field may be used to calculate and display the correct duration by using a formula. The example on the right uses the Duration1 field to calculate and display the correct duration in days of a 24-hour per day calendar using a formula.
To create the formula displayed above:
- Select Project, Properties, group, Custom Fields to open the Custom Fields form;
- Select Duration 1 from the Type drop-down box in the top right-hand side of the form;
- Click on the "Formula" button to open the Formula form and enter the formula as required;
- The formula in the picture on the right will work for a schedule that has two calendars in use;
- The formula on the right is:
- IIf([Task Calendar]="24 Hours per Day",[Duration]*0.33,[Duration])
To see more explanations like this, then consider buying my Project Management: Plan and Control with Microsoft Project online course.


Leave your thoughts here...
All Comments
Reply