Getting Started
Getting Started
Welcome to the Lecturer Guidebook

Welcome to the Uplyrn Lecturer Guidebook! This resource is designed to help you create an engaging, high-quality and unforgettable experience for your students.
We actively seek out content creators, entrepreneurs, subject-matter experts and industry-practitioners — people who has the passion to share their knowledge. So let’s get started!
Getting Started
How Uplyrn Lectures Work
Uplyrn lectures are designed to be true-to-life, just-in-time and just-for-me learnings, enabling students to apply what they learn into the real world. We want to curate a host of soft skills, technical skills and life skills, skills that can help enhance, evolve and elevate lives.
On Uplyrn, students watch video lectures in their own time, participate in live streaming lectures, and are encouraged to share their learnings with one another from all around the world. As a lecturer, you have the opportunity to play a significant role in impacting the lives of our students.
1. Make it Customised
By tailoring your lectures to the students, you will find that your success increases tremendously. Different people learn in different ways, so use different types of activities to balance it all out. Use examples, case studies, and stories to make your lectures relevant to the group. We recommend that your pre-recorded video content be broken down into a series of short 3-8 minute videos. This bite-sized format allows for focused and engaged learning.
2. Make it Fun and Interactive
Most people do not enjoy sitting and listening to someone else talk for hours at a time. Make use of the tips in this guidebook and your own experience to keep your students engaged. Mix up the activities to include individual work, small group work, large group discussions, and mini-lectures. Encourage feedback so both lecturers and students can grow together.
3. Make it Relevant
Students are much more receptive to learning if they understand why they are learning it and how they can apply it in their daily lives. Most importantly, they want to know how it will benefit them and make their lives better. Take every opportunity to tie what you are teaching back to real life.
Getting Started
How to be an Effective Uplyrn Video Lecturer
Training videos are a distinct type of video that is made to instruct a specific audience on how to perform a unique task, achieve a goal, or do something new. The overall purpose is to educate students on a topic to teach them a new skill or enhance their knowledge on a subject. So follow these steps to showcase what makes your lectures unique.
- Prepare: First consider who your audience is and what they’re looking to learn by watching your lectures. Take the time to do your research, then choose a useful and relevant topic, and outline your video lectures.
- Create: To get your ideas from your mind to paper, create a script and a storyboard. Then get the right equipment to be sure your video looks, and sounds, its best.
- Publish: Upload your video lectures and click "Publish".
- Share: Inform your friends, family, and followers to check out your masterpiece!
Keep an open mind. Be inspired. Many lecturers find that they learn something each time they create a video lesson. Enjoy it, learn from it, and make the most of it in your video lectures.
Getting Started
Why Quality of Lectures Matters
We desire for every student to have a memorable experience every time they visit Uplyrn. When students enjoy what they see, and benefit from what they learn, they hunger for more!
Lecturers are remunerated when students purchase your courses. The better your lectures are, the more popular you will be, and the more revenue you will receive.
A high-quality lecture → an unforgettable student experience → more followers and referrals → more of your other video lectures purchased → More earnings!
We recognise that creating a high-quality lecture takes time and effort. As such, we’re here to assist, every step of your lecturing journey.
Think about how your lectures will engage the learners. What are some of the ways to not only keep the attention of your learners but also create a better learning experience:
• Put a Face to the Name
People are programmed to pay attention to other people. If you want to better connect with your learners, it’s important to have your face on screen. Having a face on screen creates focus and a sense of trust and demonstrates involvement on the part of the lecturer. The impact is worth the effort.
• Speak Conversationally to Your Learners
Explain concepts in a way that is easily understandable to the layperson. When you have a wide variety of learners, you need to speak to them conversationally. They may not understand all the technical content of your lectures.
• If They Can’t Hear It, They Won’t Watch It
If the learners can’t hear clearly what you are saying, or if there is distracting background, then it doesn’t matter how good your camera is and how great your video content looks on screen. Learners will walk away
• Use the Right Tools
Use the right microphone - it’s a good idea to use a USB microphone rather than using your computer’s built-in microphone. The latter often results in a muffled sound. Screencasting software also enables learners to follow your process step-by-step while hearing your teachings.
• Rehearse before Recording
How you speak matters when you’re creating a video lecture. You will need to make sure you’re not speaking too quickly or coming across as dull, impatient or tired. Rather you will need to maintain an active pace using tonal inflections.
• Record Videos at 1080 Pixels or Higher
Review your content in both small frame and full screen. When learners view a screen capture of a user interface covered in text, and that text is too blurry to read, you will lose them.
• We Have the Attention Span of Kittens
For the sake of maintaining your learners’ attention, keep your videos short and concise. Many people have lost the attention span they need to endure a two-hour recorded lecture, even on a topic they are passionate about. Like kittens, they will go find another toy to play with.
• Incorporate Assignments and Encourage Group Discussions
We believe in learning by seeing, doing, as well as together in a community where our students can benefit by sharing their learnings with one another.
• Add Annotations
Annotations help to grab the attention of viewers and keep them engaged. Every video lecture should start from a title that tells the audience what you’re going to talk about. Take the opportunity to share your experience and background. Students need to understand you are the subject-matter expert. And end with a closing graphic that ties the whole lecture together
Preh4aring Your Video Lecture
Preparing Your Video Lecture
Planning and designing is the first and most important part of preparing your lecture. This is when you decide on:
- Lecture Outline
- Lecture Learning Objectives
- Length of Total Video Lecture
- Practice Run Date
- Video Lecture Shoot Date
- Video Lecture Shoot Location
- Budget
Preparing Your Video Lecture
Building Your Lecture Outline
You’ve searched through your expertise, validated your topic, and at long last you’ve landed on the perfect plan for your next online lecture. It’s time to start putting that wisdom onto the course builder. What’s crystal clear in your mind might be vague and confusing to others who don’t share the benefit of your insights and personal experience.
The lecture outline is a roadmap that will help you deliver content to your learners in a structured, orderly way, layering skill upon skill until they complete your lecture feeling like an expert (and eagerly awaiting your next lecture).
A lecture outline is your key to success for 2 reasons:
- Know the destination. If you know where you’re going, it helps you think about what steps your learners need to reach that point. What skills do they need to develop along the way? What foundations do you need to establish at the outset?
- Set expectations. Laying out a roadmap sets expectations for your learners. Where you’re about to serve up puzzle pieces of brand new facts and skills, your lecture outline is their picture on the box. It helps them know where they’re going, which important pieces to pay close attention to, and how to place them in context with one another. Giving your learners a sense of their destination helps them invest in the educational journey with you.
Preparing Your Video Lecture
Clear and Measurable Learning Objectives
Learning objectives aren’t just a list of what you’re covering in your lecture. Good learning objectives are what you want your students to learn or achieve (“by the end of this lecture, you will be able to...”). If you don’t know the end goal—and you don’t have certain measurable checkpoints—you can get lost along the way. Here are some tips to help you get started:
- Identify the Level of Knowledge Necessary to Achieve Your Objective
Before you begin writing objectives, stop and think about what type of change you want your lecture to make. In other words, what do you want your learners to do differently when they return to work? The domains of learning can be categorized as affective (attitude), psychomotor (skills), and cognitive (knowledge). An easy way to remember this is with the acronym ASK:
- Attitude — Changes how a learner chooses to act. It’s dealing with feelings, emotions, and attitudes.
- Skills —This domain focuses on changing or improving the tasks a learner can perform.
- Knowledge — This domain focuses on increasing what learners know.
2. Select an Action Verb
Now that you’ve identified what domain you intend to focus on for your objective, it’s time to start crafting your objective. To do that, it’ll help to have an action verb to describe the behaviour at the appropriate level of learning. Avoid having more than one action verb for each level of learning, and make sure it’s a verb that can be measured. Don’t be vague, be specific. Examples are:
Attitude
Accept • Agree • Allow • Analyze • Approve • Assess • Believe • Choose • Collaborate • Comply • Cooperate • Decide To • Endorse • Evaluate
Knowledge
Compare • Define • Designate • Discover • Distinguish • Explain • Identify • Itemize • List • Name • Recite • Recognize • Specify • Spell Out • State
Skills
Align • Alter • Assemble • Build • Calibrate • Change • Demonstrate • Design • Develop • Execute • Handle • Measure • Perform • Prepare • Process • Record
3. Create Your Very Own Objective
Now it's your turn to give it a whirl.
4. Check Your Objective
Make sure your objectives include four pieces: audience, behaviour, condition, and degree of mastery. For every one, identify and label the component.
Audience: It’s important that your objective identifies the people that will be doing the learning. Typically this will involve the word, “learner” or “student”.
Behaviour: You’ll need to identify what the learners are going to do differently. This component will contain your action verb.
Condition: This part of the objective will describe the situation of the learners.
Degree of Mastery: This part of the objective is closely tied to the change in behaviour, as it stipulates the degree of the change.
Preparing Your Video Lecture
Right-size Your Video Lectures
We get the question all the time: “What’s the ideal length for a video?”
It makes sense. Grabbing and keeping a learner’s attention is challenging, and lecturers want to be sure they aren’t making videos that are too long (or short).
The thing is, there is no ideal length for all videos — no one video length to rule them all. But, learners definitely have a preference.
Video success isn’t determined by length
Ultimately, the ideal length of a video lecture is determined by the content and the target audience. Every video has its own perfect length. Some times you need a long video. Other times you need a short video. The key is finding the sweet spot.
The majority of learners want informational and instructional videos to be less than 20 minutes, with a preference toward the 3-8 minute ranges. The next highest preferred length was for videos in the 10-19 minute range. This strongly suggests that people will watch longer videos if the content is what they’re looking for.
What you really need to ask is, “How can I keep my learners’ attention long enough to give them the information they need?”
We all know attention spans are shrinking, but that doesn’t mean it’s impossible to keep someone watching. It turns out that good content is still effective — you just have to provide it!
So the first step in keeping your learners engaged is to know what they’re looking for. You want to know these things:
- Who is your audience?
- What problem are you trying to solve?
- What are their goals?
- What will they need from you to accomplish those goals?
How can you address these questions in the most effective and efficient way?
Don’t try to do too much
When you know what your learners need and how to address it, you can plan your video accordingly.
It’s natural you’re excited to share your knowledge, so you want to want to share ALL of it. The key is you want to create a video lecture that addresses a specific problem or topic. Do that and nothing more. Create as many video lectures as you need to address as many topics, problems, pain points, etc. as necessary.
How to get Learners’ attention (and keep it)
Give the learners what they need and expect. Learners stop watching a video lecture because they didn’t get the information they expected, doesn’t matter if it’s a minute long or 30 minutes.
1. Be interesting
Use storytelling techniques and be engaging. Include practical, real-life examples your learners can easily apply and be sure to make extensive use of good visuals like images and icons to illustrate your concepts.
2. Be funny
Humour can be a great asset to keep learners engaged and entertained. But overdoing it can make your content seem less useful. Also, be wary of humour for international audiences. What may be funny in one culture can be bland (at best) or offensive (at worst) in another.
3. Use plain language
Use familiar, everyday language in your script. One of the biggest mistakes lecturers make is use language terminology, or jargon that is unfamiliar to the learners. Using big words and long, drawn-out sentences may seem scholarly, but it can come across as pompous, out of touch, and even just confusing.
Creating Your Lecture
Getting Started
Video is one of the most popular ways to deliver and consume content. That’s not changing anytime soon. And video lectures are one of the best ways to share knowledge or information.
If you’ve never created a video lecture before, this may seem daunting or overwhelming. Too often people worry about getting things perfect. It’s good to remember that perfect is an illusion. If you start with perfection in mind, it will paralyse your creative process and you will struggle to begin.
Remember, the goal of creating video content isn’t to create the perfect video, it’s to create a video that teaches something. So, join the many, many successful lecturers out there, to put out your first video and then go on to create many more excellent video lectures with us!
Creating Your Lecture
Lecturing with Effectiveness
Lecturer presence is an important component of effective online teaching, and video can help make it happen. Instructional videos have become increasingly easy to create and can turn a good online class into an engaging learning experience. Video humanises the online experience by letting learners know their lecturer as a real person, not an abstraction. Here are some tips that will soon have you broadcasting like a pro.
- Forget the headset. If your computer doesn’t have a built-in camera and microphone, buy a webcam that does both. Webcam sound quality is almost as good as a headset’s, and it lets you be “you” without the Mickey Mouse ears.
- Keep it short. Few learners will sit through videos where the lecturer drones on and on. If you have a lot to say, break up the message into separate chapters of 3-8 minutes each.
- Position the camera above your eyes, so you look slightly up at it. Avoid looking down at the camera. Your audience does not want to look up your nose. If you’re using a laptop, put a stack of books under it so you raise the camera. Position your head to appear at the top third of the screen so the recording includes your face and most of your torso.
- Location, location, location. Your work or home office are usually safe choices as a background for the recording. Outdoors can be a nice change. Try putting your back to a neutral wall with the light source in front.
- Move it out. Don’t always shoot your videos from the same spot. Your audience will tire of seeing the same background. Start with your office, but also consider a quiet spot in your living room or backyard. Keep the backgrounds neutral but varied. Your audience will appreciate it.
- Look right at the camera lens. Looking anywhere else looks weird. Your audience will think you have an avoidance problem.
- Cover your screen. Once you get everything ready, consider taping a piece of paper over your computer screen so you’re not distracted by seeing yourself while you record. Remember, you do not need to be perfect! Try not to be overly critical of yourself.
- Say “cheese.” Smiling helps everything. Whether you’re recording a webcast of your face or just your voice, smiling makes you look and sound better.
- Avoid over doing it. The wacky music, goofy fade-ins, and spinning transitions that come with some video editing software can make home-videos look corny. Leave most of those tools for the professionals (who don’t really use them either).
Creating Your Lecture
Toolkit
If you want to create video lectures you need to have the right tools. Keep in mind that you do not have to have the most expensive, top-of-the-line tools to create high-quality video. Nor do you have to hire a professional crew or go to film school. These days, you can create excellent video with very modestly-priced tools and some basic knowledge about how to use it effectively.
Video Camera
When your aim is to create video lectures of the highest quality, it can be tempting to blow a lot of money on a fancy video camera, but these days, it’s really not necessary to spend a lot to get excellent, high definition video. Consider the following options:
- Your phone – If you don’t already have a video camera, start from your phone. Smart phone have gotten so good with video that you may not need anything more.
- Canon Vixia Series – If you do decide to step up to a dedicated video camera, take a look at the Canon Vixia series. The quality is excellent and the Canon VIXIA HF R700 is a great all around choice for under $400, or you can upgrade to the Canon VIXIA HF G20 HD if you are really looking to be a video pro (and still achieve amazing quality for far less than the other high-end video cameras).
Lighting
While having a good camera is important, good lighting is the essential element that will enable you to create video lectures that look truly professional. In general, always try to shoot video in places where there is plenty of light, preferably natural light. To the extent that you need to add in light, or simply have better control over it, consider:
- Studio Photography Softbox Light Kit – A solid, relatively low-priced lighting set-up that provides all of the major tools you need to light your video properly.
Audio
Your camera will, of course, have a microphone, but using the camera microphone is usually not the way to get the best sound in your videos – particularly if you are filming in a place that has background noise. To get better sound, consider using either a shotgun microphone – a highly directional microphone that picks up only what it is pointed at or a lavalier/lapel microphone – a microphone that clips to the lapel or some other part of the clothing of the person speaking.
Tripod Stand for Camera or Phone
With a good camera, lighting, and audio, you are pretty much set. There is, however, one absolutely essential accessory that you need: a solid tripod. If you are using your smart phone as your video camera, you are going to need this.
Creating Your Lecture
Different Styles of Lecture Videos
There are a wide variety of different styles of video you can choose. Selecting the right video style means thinking about your goals for that video lecture.
Screen Share
A screencast is a digital video recording of your computer screen that typically includes some sort of audio narration. They are also called screen capture videos or screen recordings.
Screencasts are great for teaching or sharing ideas. Best of all, these videos benefit both lecturers and the learners. The lecturer can record a process or instruction once and without repeating themselves. The learner also benefits because they can watch the video whenever it’s most convenient for them. This is especially helpful because learning can happen in real time—right when it’s needed.
- Choose Your Screen Recording Software
To get started, decide what software you’re going to use to record your screen. Look for a screencasting tool that also has a built-in video editor. Using a screen recorder and editor together makes creating screencasts much simpler.
- Prepare Yourself and Your Screen for Recording
First and foremost, tidy up your screen if you’re going to be showing it off in your recording. You may want to get rid of a distracting desktop wallpaper and make sure to turn off any notifications. You’d hate to have your email notification chime go off right in the middle of you talking through an otherwise perfect demo recording. If your screencast is more than a few seconds long, it’s a good idea to script what you’re going to do onscreen and/or what you’re going to say.
- Record Your Screen
It’s time to record your screen. Decide which part of the screen you’d like to record - full screen or just a region. The system audio and microphone are recorded by default. To record the audio, click the audio dropdown to select your microphone or audio device. If you find that you have low volume, drag the audio slider to increase the audio level.
- Make adjustments to your recording
If you accidentally said “um” too many times, start your recording a little early, or let it go too long, no worries. It’s easy to trim unwanted parts out of your recording.
- Save and Share Your Screencast
Now, you’re ready to share your screencast! You can produce it as a local file (mp4 file) to your computer.
Level Up Your Screencasts
If you’re feeling comfortable with a quick screencast, it may be time for you to step-up by adding some personal touches to your screencasts to make them stand out and give them a truly personal touch.
- Record Your Webcam
Adding webcam video can help add personality to your screencasts and increase engagement. Before recording your webcam footage decide if you want it to appear at the beginning of your video or if you want it to appear over top of your video, like picture-in-picture. To record a webcam, click the dropdown to select the camera device. Then, choose your audio recording options.
- Narrate Your Screencast or Add some Background Music
It’s easy to demonstrate an onscreen process with a screencast, but you can make instruction even more clear by talking through the process as you show it. You can also add some music to your screencast to set the mood of your video—just make sure it’s not too loud if you’re also narrating onscreen activity.
Talking Head
Talking head videos are pretty much what they sound like: A lecturer talking to the camera—either looking directly at it or gazing slightly to the side (also known as an interview style talking head). Because the focus is on a single person, talking heads are great for establishing expertise on a topic and are popular for thought leadership videos.
While talking head videos are good for creating a connection with your learners, the lack of visual stimuli means they’re not always engaging enough to hold learners’ attention for long. Try mixing things up by using more than one camera and cutting between different perspectives (such as a tight shot and a wide shot), including B-roll, shooting in front of a compelling backdrop, or adding in graphics.
360-Degree
An immersive video format, 360-degree video records a view in every direction at the same time using an omnidirectional camera or a collection of cameras. These videos can be viewed through a headset that shows a learner different parts of the scene depending on which direction they turn their head or via on a standard screen, where learners click or tap to change the view.
This format is a good choice for putting an interactive spin on your content. You can use this effectively to provide a unique perspective on an activity, and to give learners the experience of “being there."
Put It All Together
You’ll likely use different video styles for different video lectures, depending on the type of content, the intended audience, your goals, and more.
Be sure to test out style options to see what best suits your lecturing style and to discover what your learners responds to.
And, while you’re experimenting, keep in mind that some video styles can be combined to create a unique look and feel.
Creating Your Lecture
Editing Your Lecture
You’ve filmed a video lecture, and now it’s time for the post-processing stage. The video editing process can be made much easier and more productive by following a few key steps:
Choose the Right Software
-
For Macs
- iMovie (Comes standard on Macs)
- DaVinci Resolve (Free)
- Avid Media Composer (Free + Paid Version)
- iSkysoft ($69)
- Screenflow ($129)
- Camtasia ($249)
- Final Cut Pro ($299)
- Adobe Premiere Pro ($21/month)
-
For PCs
- DaVinci Resolve (Free)
- Avid Media Composer (Free + Paid Version)
- Lightworks (Free + Paid Version)
- iSkysoft ($69)
- Camtasia ($249)
- Sony Vegas Pro 365 ($16/month)
- Adobe Premiere Pro ($21/month)
- Autodesk Smoke ($205/month)
Use a Fast Computer
This allows you to focus more on your editing work without having to worry about slow rendering. It definitely also helps to invest in a faster storage drive (SSD) that will allow you to access your files and software faster, as well as speed up your rendering, loading, and export times.
Edit for a Story
Tell a great story. Go beyond the basics, cut away extraneous footage and correcting the order of your clips. Take the opportunity to make your lecture aesthetically-pleasing and dramatically compelling so as to evoke the right emotions and effectively impart your intended lecture.
Maintain an Efficient Workflow
You need to be systematic and organised in order to become a more efficient editor. Organise your content and files in folders that you can use again and again.
We recommend that you use external hard drives that can be connected via USB 3.0 or Thunderbolt to enable faster file transfers. Also consider allocating your RAM to be able to use more of it for editing.
Colour Correct Your Video
Color is a major design element that can be used to highlight certain subjects, evoke specific emotions, and set the mood or atmosphere of your lecture.
- Colour correction - Make sure that the colours of your footage are consistent in each scene
- Colour grading - Give your lecture a different look.
Both are essential when you want most of your footage to look as realistic as possible, or to differentiate certain footage from others.
Add Text and Graphics
Depending on your content, you may have to include more text. If you need to add flashy graphics, Adobe After Effects is a popular choice.
Creating Your Lecture
Exporting and Publishing
Once your video lecture is done and ready to be exported, the goal is to create a file that maintains its high quality without making it too heavy for publishing and online viewing.
Video Specifications
- Recorded at a minimum resolution of 1920x1080
- Must include an audio track
- 16:9 Aspect Ratio for slides + video format
- Frame rate: Either 24 or 30 fps
Exporting Specifications
- Bit rate: 20mbps
- Not greater than 2GB in size
- Use .mp4 when exporting your video files
- Recommended Codec: H.264
- Audio codec: AAC-LC
Pre-Publishing Packaging
How to Optimise Your Video Lectures
- Make Your Title Count
Video titles can pull powerful traffic.
- A great title can instantly grab a learner’s attention.
- When you use the appropriate keywords in your title, you are more likely to show up on search engines when learners are searching for your topic.
-
Provide Excellent Content
Take some time to think about your ideal learner. What do you know that they’ll find valuable? What can you teach them? “How-to” videos are extremely successful because not only do they offer great value to your learner, but also you’re able to showcase your knowledge and skill, thus positioning yourself as an expert. This is key as you continue to grow your brand identity.
-
Include Your URL in Your Video
When you edit your video, take advantage of the different editing features. One easy feature is to add a text box to your video. This is where you can display your website (or Facebook, LinkedIn, etc) address and it’s a great way to get exposure.
Pre-Publishing Packaging
How to Supercharge Your Video Lectures
- Create a Campaign
To get noticed, think beyond stand-alone video lectures. For greater reach and exposure, create a series of content-rich video lectures that you can publish regularly. Not only will this create a great synergy around your content, but it will also allow you to build upon your brand identity as each video lecture is published.
- Always Include a Call to Action
Never miss the opportunity to ask your learners to take some type of action at the end of your video lecture. You can ask them to leave a comment about your video lecture, give good reviews if they like what they learnt or ask questions. If your video lecture is good, you’ll likely have their full attention; make sure to take advantage of it!
- Don’t Make a Sales Pitch
There is a lot of sales clutter everywhere and you want to make sure you come out above this. Use your video lecture to define a problem, discuss solutions and support the learners — when you combine the three, your video lecture will attract the right following.
Pre-Publishing Packaging
Basic Keyword Strategies
To optimize your video lectures on Uplyrn, make sure to use keywords in your videos’ titles, descriptions, and tags. Target specific search phrases, not just search words.
- For example, instead of using “cupcakes” as a keyword for an organic bakery, use “cupcakes with organic frosting” for a better chance of showing up on the front of search results
Pre-Publishing Packaging
Spark Your Video Lecture Creativity
Educate
Tell learners about your topic. Give them details on lecture outline and benefits of learning the topic. Tell them everything they’ll receive once they make the purchase of your video lecture.
Answer Questions
What do you get asked most about your lecture? Most of us can think of a list of at least 5 to 10 questions we get asked often. Make a short 2 to 3 minute video segment where you state the questions and then the answers. These are easy to make and extremely valuable to your learners.
Talk about Your Case Studies and Results
Make a video segment about the results you were able to achieve while working with different learners or talk about a case study and show what you did for them and how you can do the same for the new learners. You can also show a case study of a learner who did not follow your guidance or use the method you teach and fail to achieve the desired result.
Tell A Story
Learners can relate to you when you tell a compelling story. Weave a lesson into your story as a takeaway. You can also tell about an event from your past that has shaped who you are as a video lecturer today.
Debunk Myths
Talk about the top three myths in your industry and give real examples to show why they are truly myths.
Take Your Learners Behind the Scenes
Take your learners outside of your “classroom” and show yourself in your “natural surroundings.” If appropriate, show things that are meaningful to you, that played a part in creating the video lecture. Tie in some of your business and/or professional secrets — how you organise your business and/or work, what type of setup you use to get things done, etc. Pull back the curtains and give tips on how you achieve your goals.
Ask Questions and Answer Them
Ask your learners some key questions that will get them thinking about their wants and needs as they relate to your video lecture. Then ask your viewers to leave their answers in the comments section and you can personally answer them. This will start discussion and spark community-based learning.
Pre-Publishing Packaging
Step-by-Step Publishing Guide
Once you have all your materials ready, you can host your lecture!
- Log in to your Uplyrn Account.
- Click “Create Course” in the upper righthand corner.
- Add yourCourse Titl.
- In the Categories and Tags sections, choose the categories (maximum of 3 categories) and tags (maximum of 50 tag words) that most accurately apply to your course. These are important steps in helping students find your course so be sure to choose the correct categories and tag words.
- Add your Course Descriptio. Please note that you will not be able to publish your course without a course description. If you would like an image and preview video to appear in the course description, you can add one by selecting Cover Photo and Preview Video above the course description text box.
- Next, let your students know what they will learn from your course and course requirements, if any.
- For Course Pric, make sure you have a verified PayPal account that can receive payment and that you have activated your PayPal account on Uplyrn in your Payment Setu.
- Remember to click “Save” before proceeding to upload your video lectures.
- To upload your video lectures, go to the side menu and click “Syllabus”. Add your Section Title and click “Add Lesson”. Make sure your video is either an .mp4 or .mov when exporting your video files. Each video must also be under 2GB. To publish your course, the combined length of all your videos must total at least 10 minutes.
- Congratulations! You’re ready to publish your first course! Go to the side menu and click “Settings”, and you will see Course Publication Statu, then select “Published”.
- Students need to feel welcome right from the start of your course. It’s a great way to say hello, introduce yourself and let students know what they can expect. A Welcome Message starts the relationship on the right foot, show students you are accessible and approachable, keeping them engaged and increases their loyalty.
- As a lecturer, it must be a joy to see your students complete your course and working towards what they have learnt from you. Be sure to send them a Congratulatory Message to recognise their achievement and continue to motivate them towards a journey of lifelong learning.
- Click “Courses” in the upper lefthand corner and check out your newly published lecture!
Promoting Your Lectures
Congratulations! You’ve just published your first lecture on Uplyrn! Now that your video lecture is live, promoting it will help you build a following and start earning revenue. Invite your friends, family, colleagues, and social media followers to purchase your video lecture!
Making Your Video Lecture Free
You can opt to make the video lecture itself Free on Uplyrn. Making your lecture free on Uplyrn can quickly grow your student following. You will experience a significant uptick in learners and followers. Most lecturers will have one video lecture free so as to quickly grow a following in order to monetise on their other video lectures.
Select your lecture to “Free” in the Additional Details section of your lecture creator (within Lecture Info):
Use Your Marketing Channels
- Use your Social Media Channels to promote your class - Facebook, Instagram, LinkedIn, Youtube, TikTok, etc.
- Inform your Closest Community to support you as you embark on your journey as a Video Lecturer - Family, Friends and Colleagues.
- Reach out to Bloggers, Influencers and Niche Communities to feature your lecture - People who share the same passion as You.
How Earning Works
Video Lecture
Uplyrn operates under a hybrid model, either Learn-On-Demand Model or Subscription Model. Learners can choose to pay for each individual video lecture based on their interest to gain specific skills and knowledge or they can subscribe to an annual membership to enjoy full access to all available video content. Once the learner purchased the video lecture or subscribe to an annual membership, they have lifetime access to it.
Our Video Lecturer Revenue Share Model is consistent and transparent:
1. Organic Revenue:
- 50% of revenue for organic course purchases
- 40% of the total membership revenue goes to a monthly subscription pool for lecturers
2. Paid User Acquisition Channel Sales:
- 25% lecturer revenue share for course purchases
- 25% of the total membership revenue goes to a monthly subscription pool for lecturers
Virtual Class / Coaching Session
Our Expert Revenue Share Model is consistent and transparent:
- Organic Revenue: 70% of revenue for organic virtual class purchases and coaching sessions.
- Paid User Acquisition Channel Sales: 50% revenue share for virtual class purchases and coaching sessions.
How to Integrate Zoom
Create a Server-to-Server OAuth.
Follow the steps below to create a Server-to-Server OAuth app to use with your account credentials:
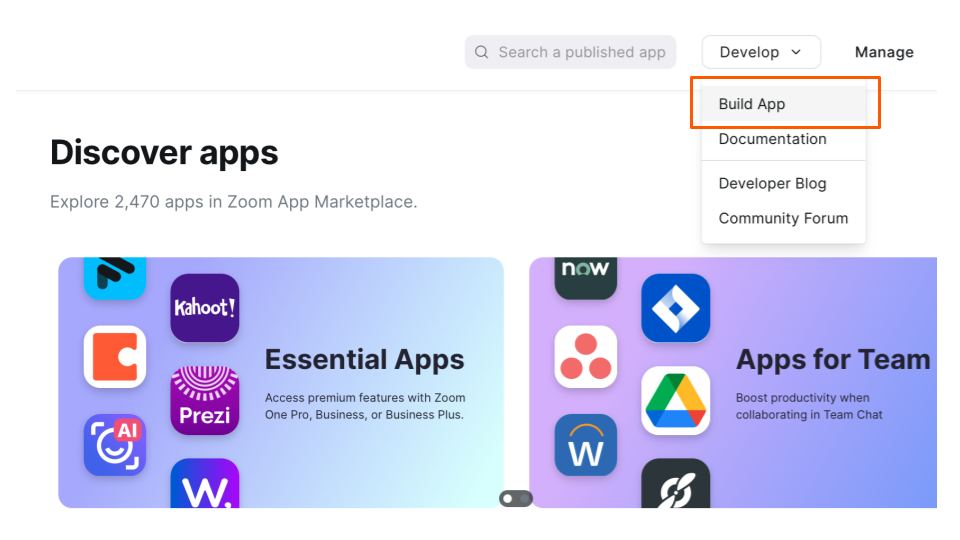
- Open a new browser tab and Sign In to your developer app https://marketplace.zoom.us.
- At the Top Navigation Bar, go to Develop and from the drop-down menu, Click Build App.
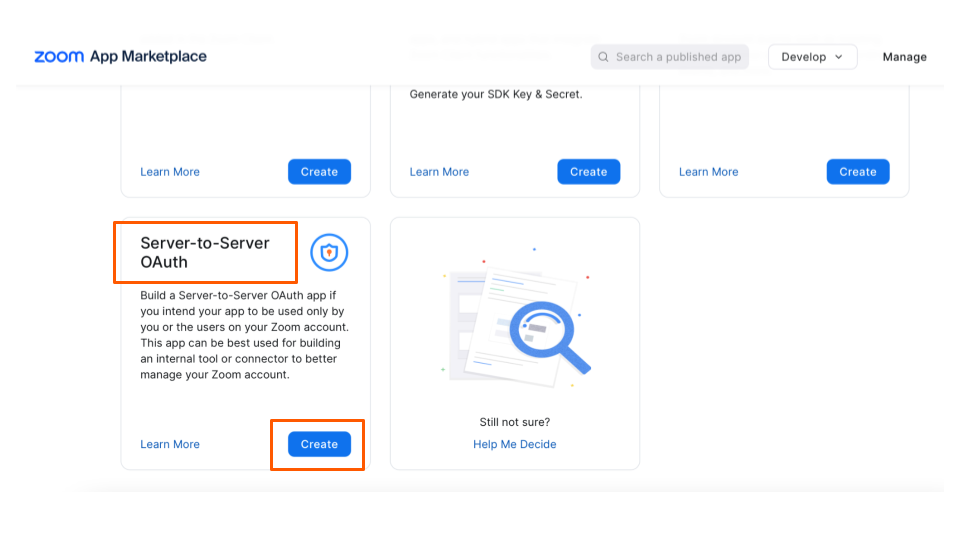
- Look for the Server-to-Server OAuth tile and click Create.
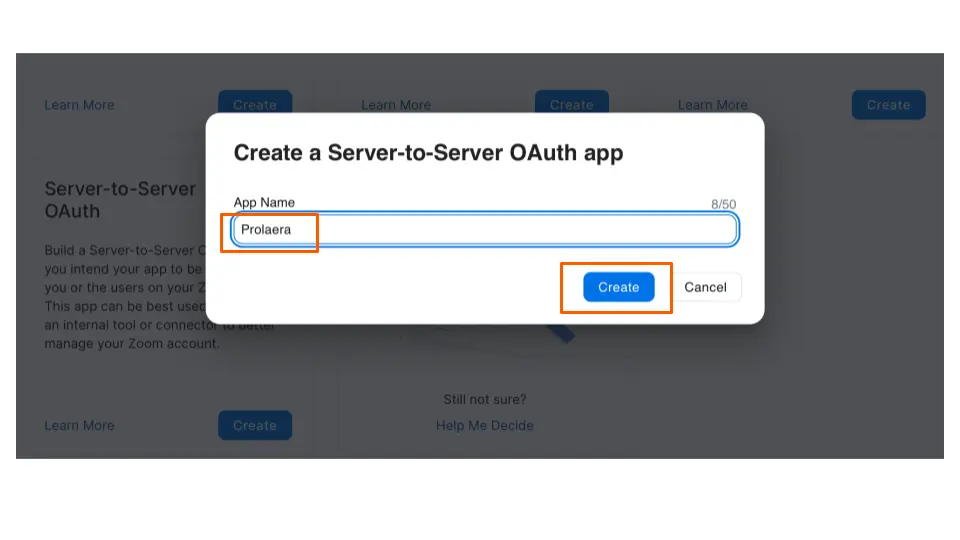
- Name your app Prolaera then click Create .
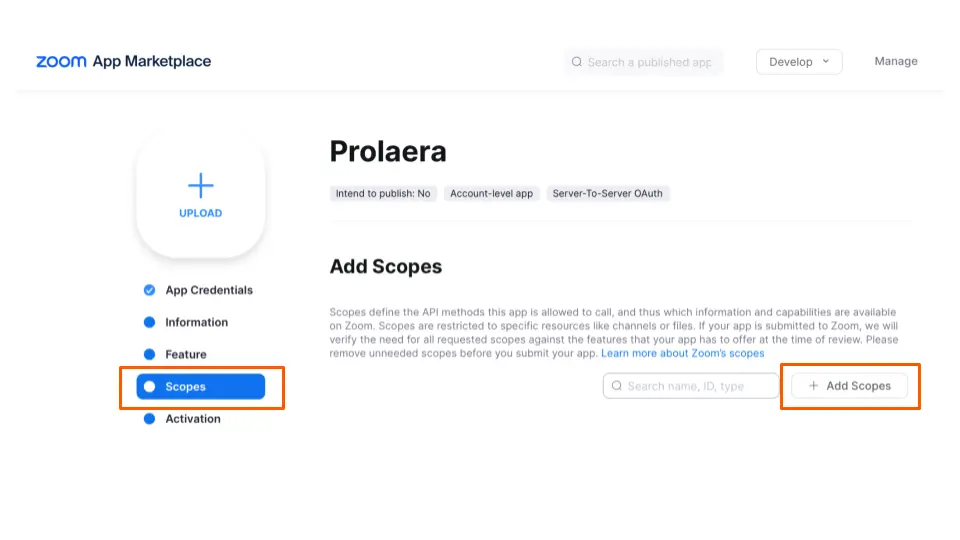
- At the Side Menu, select Scopes, then click on + Add Scopes.
-
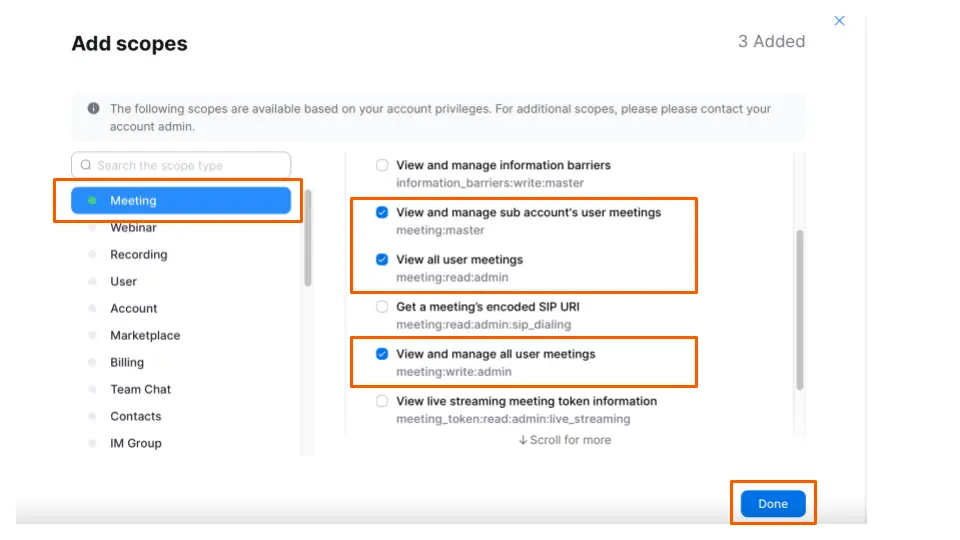
At the Side Menu, click on Meeting then select the following:
- View and manage sub account's user meetings.
- View all user meetings.
- View and manage all user meetings.
-
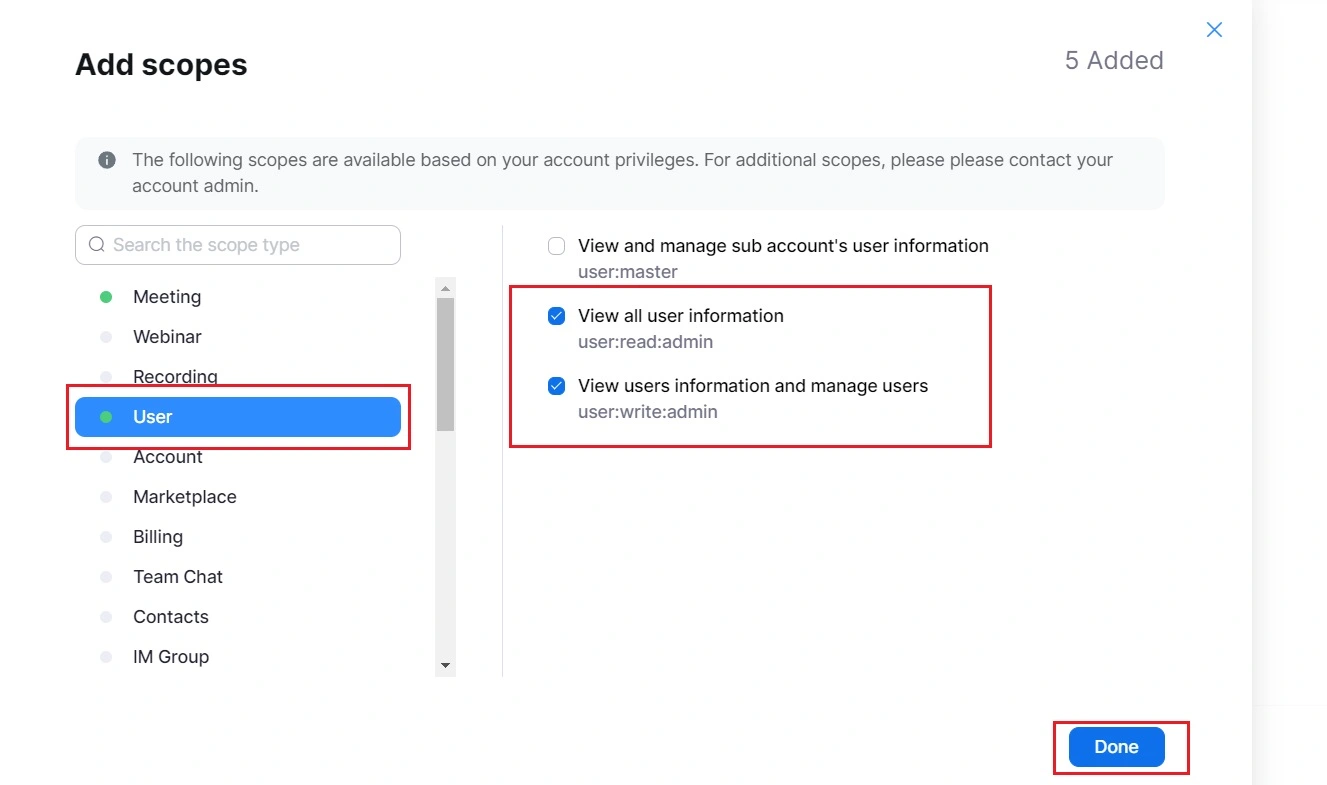
At the Side Menu, click on User then select the following:
- View all user information.
- View users information and manage users.
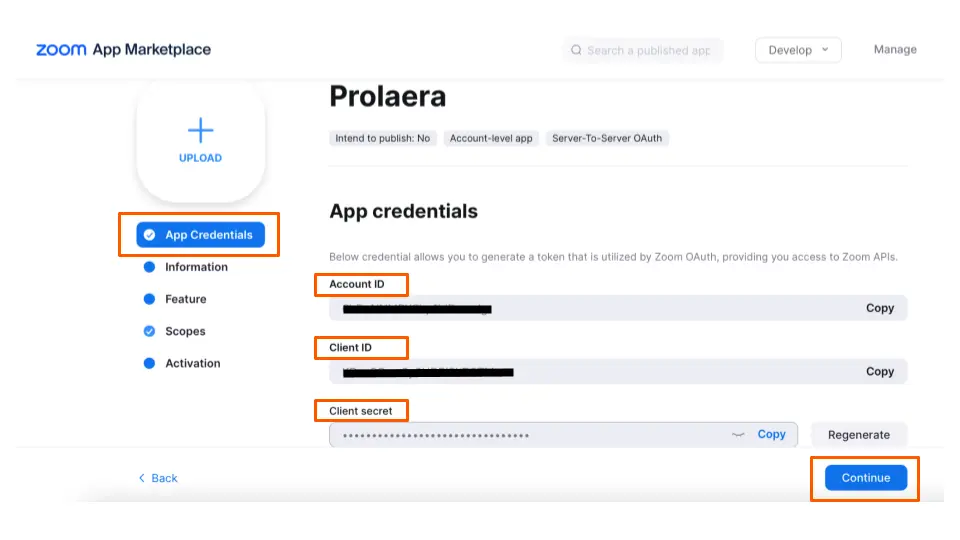
- At the Side Menu, select App Credentials and you will see your newly generated Account ID, Client ID and Client secret keys. Then click Continue.
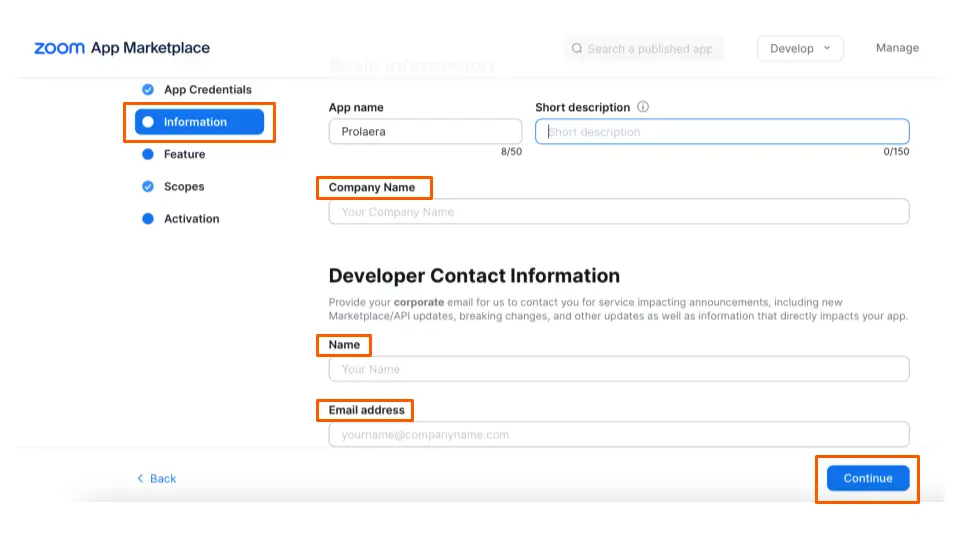
- At the Information page, you will be required to provide Company Name, Your Name and Email address. Then click Continue.
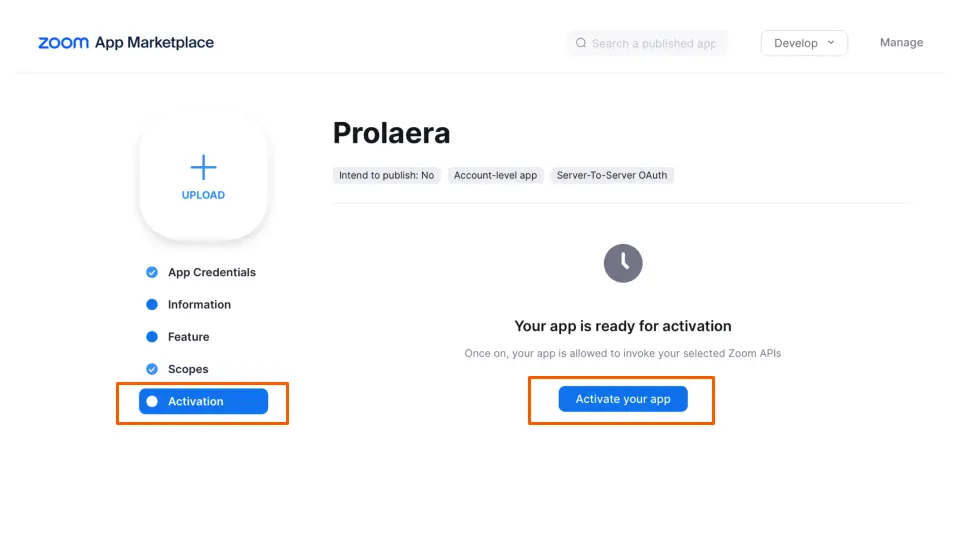
- Your app is now ready for activation. Click Activate your app.
Login to your Uplyrn account at uplyrn.com:
- At the Side Menu of your Dashboard, Click on Meeting Setting.
- Copy and Paste your newly generated Zoom App Credentials: Account ID, Client ID and Client secret keys and you're all set to go!
