How to Self-Publish a Book on Amazon: A Practical Guide
To successfully self-publish on Amazon, you really need three things firing on all cylinders: a manuscript that’s been polished until it shines, a cover that grabs attention, and KDP settings that are dialed in just right. The whole game is about turning your raw manuscript into professionally edited and formatted files, getting your KDP account set up, and then uploading everything with smart keywords and categories so readers can actually find you.
Jump To Section

Earn As You Learn
Earn 25% commission when your network purchase Uplyrn courses or subscribe to our annual membership. It’s the best thing ever. Next to learning,
of course.
From Polished Manuscript to Print-Ready Files
Before you even think about logging into your KDP dashboard, your book needs to be ready for its close-up. We've seen it a hundred times: a great story idea torpedoed by a manuscript riddled with plot holes or distracting typos. That's the quickest way to sink your author career before it even starts. Getting from "final draft" to a book people will happily pay for is a critical phase, and it all begins with a tough, honest edit.
The Non-Negotiable Step: Professional Editing
So you've typed "The End". Congratulations! Now the real work begins.
Your first editing pass is always a self-edit. A trick we swear by is reading the manuscript out loud. It's amazing how many clunky phrases and repetitive sentences you'll catch that your eyes just skim over. This is your chance to fix those glaring plot holes or structural issues before you let anyone else see it. If you want to get better at this stage, it's worth taking some time to actively improve your writing skills—it makes a huge difference.
But let's be real: self-editing only gets you so far. You're simply too close to the story. Hiring a professional editor isn't just a good idea; it's a non-negotiable investment that transforms your work from a hobby into a professional product. Readers will notice the difference, and their reviews will absolutely reflect the quality.
There are a few different layers to the editing process, and each one is crucial:
- Developmental Editing: This is the big-picture stuff. A developmental editor digs into the core of your book—the plot, character arcs, pacing, and overall structure. They're the ones who might tell you to cut that chapter that’s dragging the story down or merge two characters to create a more compelling one.
- Copy Editing: Once the story is solid, the copy editor steps in to work at the sentence level. They're hunting for grammar, punctuation, and spelling errors, but they're also sharpening your prose for clarity, fixing inconsistencies, and making sure everything flows smoothly.
- Proofreading: This is the final, final check. The proofreader is your last line of defense, catching any sneaky typos or formatting glitches that made it through the other rounds. Their job is to ensure a flawless reading experience.
Practical Example:
- A developmental editor might read your mystery novel and say, "The reveal of the killer in Chapter 20 feels unearned. Let's go back to Chapter 5 and add a subtle clue about their alibi."
- A copy editor would then correct a sentence from "The detective ran quickly towards the pier" to the more active "The detective sprinted toward the pier."
- Finally, a proofreader would catch the typo where "pier" was accidentally spelled "peer".
Formatting for Ebook and Print
With your manuscript edited to perfection, it’s time to get it dressed up for both the digital and physical shelves.
Proper formatting is what makes your book look professional, whether someone is reading it on a Kindle or holding the paperback in their hands. Bad formatting—like weird spacing, an ugly font, or a table of contents that doesn't work—just screams "amateur", and it's an easy way to get slapped with negative reviews.
When it comes to the actual formatting, you’ve got two main options: do it yourself or hire a pro.
- DIY Formatting Tools: Software like Vellum (for Mac users) or Atticus (for PC/Mac) are game-changers. They make it incredibly simple to generate beautiful, professional ebook and print files in minutes. They do have a one-time cost—usually around $250—but if you're planning on writing more than one book, they are worth every penny.
- Hiring a Professional Formatter: If you'd rather not touch the technical side of things, you can hire someone to create your print-ready PDF and ebook files. This usually runs between $100 and $300 and can save you a ton of time and headaches.
Actionable Insight: Before finalizing your print formatting, check the trim size of the top 3 bestsellers in your specific genre on Amazon. If all the top mystery paperbacks are 5.5 x 8.5 inches, formatting yours to be a large 8 x 10 will make it look out of place on a shelf. Match the reader's expectation for the physical product.
Beyond just the look of your book, it's also about knowing how to make and sell an ebook people want to buy. Getting this foundation right ensures that your beautifully polished and perfectly formatted book actually finds its way to the right readers.
The journey here is pretty straightforward, moving from your edited text to a finalized, ready-to-upload file.
As you can see, these aren't steps you can skip. Editing, formatting, and a final check are what get you a market-ready book.
Designing a Cover That Sells Your Book
Let’s be brutally honest. In the endless digital bookshelf of Amazon, your book cover is everything. It's your first impression, your silent sales pitch, and often, the only thing a potential reader sees before they scroll on by.
A professional cover does more than just look nice; it's a visual contract with the reader. It instantly signals the genre, hints at the tone, and builds a sense of trust before they've even read your book description. This isn't just art—it's marketing.
The single biggest mistake new authors make is designing a cover based on what they like. This isn’t about your personal taste. It’s about meeting established reader expectations. A thriller needs to look like a thriller—think bold, sharp fonts and dark, moody imagery that screams tension. A romance cover, on the other hand, must immediately communicate its heat level. Are we talking a steamy, shirtless-hero kind of read, or a sweet, illustrated rom-com? Each has a distinct visual style that loyal readers look for.
Even non-fiction follows these rules. Self-help books almost always feature clean typography and a single, powerful image that communicates the book's core promise in a single glance.
Finding the Right Designer for the Job
Unless you happen to be a graphic designer, hiring a professional is one of the smartest investments you can make in your author career. We've seen great books fail because of bad covers and mediocre books succeed because of brilliant ones.
Marketplaces like Reedsy and 99designs are fantastic for finding designers who live and breathe book covers.
But how do you pick the right one? Here's what to look for:
- A Genre-Specific Portfolio: This is non-negotiable. Look for a designer who has a deep portfolio of covers in your specific genre. A brilliant sci-fi artist might completely miss the mark on a cozy mystery.
- Clear Communication: A good designer is a partner. They should ask probing questions about your book, understand your vision, and clearly explain their creative process.
- Rave Reviews: See what other authors are saying. Testimonials that speak to professionalism, timeliness, and the quality of the final product are gold.
Actionable Insight: When you find a designer you like, don't just look at their portfolio. Go to Amazon and search for the books they've designed. See how those books are performing. Are they selling well? Do they have good reviews? This real-world data is far more valuable than just a pretty picture in a gallery.
To get the best possible cover, you need to write a killer creative brief. This is your chance to arm your designer with everything they need. Clearly outline your book’s genre, target audience, major themes, and any specific symbols or ideas you have. The most helpful thing you can do? Send them links to 3-5 bestselling book covers in your niche that you love. This gives them a clear visual language to work with from day one.
The Budget-Friendly DIY Approach
Look, we get it. Budgets can be tight, especially when you're starting out. Going the DIY route is an option, but you have to be realistic.
Tools like Canva have templates that can get you started. However, DIY covers often scream "amateur" through common mistakes like clunky typography, low-resolution images, and a complete misunderstanding of genre conventions. An amateur cover can kill sales before they even happen.
If you absolutely must design your own, stick to simplicity. Use one high-quality stock photo, choose a clean and legible font for your title, and make sure there's high contrast between your text and the background.
To give yourself a fighting chance, take some time to understand the 8 essential elements of graphic design. It'll provide a solid foundation. Even so, a professionally designed cover will almost always deliver a better return on investment. It's one of the most important decisions you'll make when you decide how to self-publish a book on Amazon.
Navigating the Amazon KDP Dashboard
Alright, with your manuscript polished and your cover looking sharp, it’s time to dive into Amazon's world. This is where all your hard work pays off, turning those files on your computer into a real, buyable book.
Your command center for all of this is the Amazon KDP (Kindle Direct Publishing) dashboard. It can look like a lot at first glance, but once you know your way around, it's actually pretty straightforward.
Don't underestimate the power of this platform. The self-publishing market, largely driven by KDP, is exploding. We're talking about a market projected to grow at a 16.7% CAGR from 2025 to 2033, swelling from $1.85 billion to an incredible $6.16 billion. A huge chunk of that is fueled by the 2.6 million titles hitting KDP every single year.
The dashboard is your direct line into that market. First thing's first: you need an account. It's a simple process that just connects to your regular Amazon account.
Getting Your Account Set Up for Success
Before you can even think about uploading your book, Amazon needs to know who you are and, more importantly, how to send you your royalties. This part is critical, so take your time and double-check everything.
You’ll be asked to fill out three main sections:
- Author/Publisher Information: This is just the basics—your name, address, and phone number.
- Getting Paid: Here's where you'll plug in your bank details. Amazon pays out via direct deposit, so you'll need your account and routing numbers handy.
- Tax Information: This is a simple "tax interview" which is really just a guided questionnaire to figure out your tax status. If you're in the US, it's a breeze. This step is non-negotiable, as it allows Amazon to handle tax withholding correctly.
With that out of the way, you're officially ready for the fun part. Head over to your "Bookshelf" page to start building your book listing. For a deeper dive into this initial setup, this beginner's guide to Kindle KDP is a fantastic resource to walk you through it.
Uploading Your Manuscript and Cover
Once your account is good to go, hit that "Create" button. The KDP dashboard will guide you through three main tabs for your ebook: Details, Content, and Pricing.
On the "Content" tab, you'll finally upload your files. Click "Upload eBook manuscript" and select your perfectly formatted file—EPUB is the gold standard here. Next, do the same for your cover file, using a high-resolution JPG.
Actionable Insight: Do not skip the "Launch Previewer" tool. We repeat, do not skip it. This is your chance to see exactly how your book will appear on different Kindle devices and apps. Scour it for any weird formatting glitches—funky line breaks, misplaced images, anything that looks off—before you even think about publishing.
Catching a mistake at this stage will save you from a world of hurt and a slew of bad reviews later. If something's wrong, just head back to your formatting software, fix it, and re-upload the file. Simple.
Crafting a Book Description That Actually Sells
Your metadata is your book's sales pitch to the world. This is all the info about your book—title, subtitle, author name—but the real heavy lifter is your book description.
Stop thinking of your description as a summary. It’s not. It's the trailer. It needs to grab a potential reader by the collar, build irresistible curiosity, and end with a powerful nudge to hit that "buy" button.
Amazon lets you use a little bit of basic HTML to make your description pop. Don't worry, you don't need to be a coder. A few simple tags are all you need:
- <b>Your Text Here</b> makes text bold. Perfect for a hooky first line.
- <i>Your Text Here</i> makes text italicized. Great for adding emphasis.
- <ul> and <li> create bullet points. Use them to list key takeaways for non-fiction or tantalizing plot points for a novel.
Practical Example:
Imagine you're a thriller author. Instead of a boring block of text, you could do this:
- He thought he’d left his past behind. The past disagreed.
- A missing journalist. A town with a deadly secret. A killer who knows his name.
See the difference? This simple formatting makes the text scannable, punchy, and way more compelling. Getting this one small detail right is a huge step toward mastering how to successfully self-publish a book on Amazon.
Getting Discovered: Keywords, Categories, and Pricing
Getting your book onto Amazon is one thing. Getting readers to actually find it? That's a whole different ballgame.
This is where the real work of self-publishing begins, and it all boils down to three critical pieces: keywords, categories, and pricing. Nail these, and your book has a fighting chance of rising to the top. Get them wrong, and it’ll be buried in the digital slush pile.
The sheer scale of the competition is staggering. In 2023 alone, over 2.6 million new self-published books flooded Kindle Direct Publishing (KDP). To put that in perspective, traditional publishers released maybe 10,000 titles in the same timeframe. You're not just competing; you're trying to get noticed in a massive, ever-growing crowd.
Unlocking Visibility with Smart Keywords
Think of keywords as the secret handshake between you and your ideal reader. They're the exact words and phrases people are typing into that Amazon search bar, and your job is to guess what they are.
You don't need a crystal ball for this. Just use Amazon's search bar.
Here's a practical example:
Let's imagine you've written a fantasy novel featuring dragons and a magical academy.
- Head over to the Kindle Store.
- Start typing "fantasy books with..." and just watch what Amazon autocomplete suggests. You’ll likely see phrases like "fantasy books with dragons and romance" or "fantasy books with magic schools for adults".
These are gold. They're called long-tail keywords, and they signal a reader who knows exactly what they want. Someone searching for "epic fantasy with a strong female lead" is much closer to buying than someone just typing "fantasy".
KDP gives you seven keyword slots in your dashboard. Use them wisely. Amazon already pulls from your title and subtitle, so don't waste space by repeating those words. Getting this right is fundamental to Mastering the Amazon A9 algorithm, which is what determines who sees your book.
Conquering the Bestseller Lists with Niche Categories
You can choose up to three categories from your KDP dashboard, but the real magic happens when you dig deeper into more specific, less crowded sub-categories.
Let’s be honest: hitting #1 in a gigantic category like "Fantasy" is next to impossible. But becoming a bestseller in a niche like "Fantasy > Epic" or "Coming of Age Fantasy"? That's totally doable.
Actionable Insight: The moment you hit #1 in any category, even a tiny one, your book gets that glorious orange "#1 Bestseller" tag. That little badge is pure social proof and can make your sales skyrocket.
So, how do you get into more than three categories? Simple. You can request placement in up to 10 niche categories after you publish.
- Do some recon. Find a book similar to yours that’s selling well. Scroll down its product page to the "Product details" section and click on its "Best Sellers Rank". You'll see the exact category paths it's listed in.
- Copy the path. Make a note of the full category string. It’ll look something like this: Kindle Store > Kindle eBooks > Teen & Young Adult > Science Fiction & Fantasy > Fantasy > Myths & Legends.
- Ask Amazon. After your book is live, go to your KDP account's "Help" section and click "Contact Us". Follow the prompts for "Amazon product page" and "Update Amazon categories". Then, just paste in the full category paths you want to be added to.
It's a small bit of admin work that can make a massive difference in your book's visibility. While you're at it, diving into how to use Google's Keyword Tool with competitor research can give you even more ideas for finding profitable keywords.
Pricing Your Book for Profit and Perception
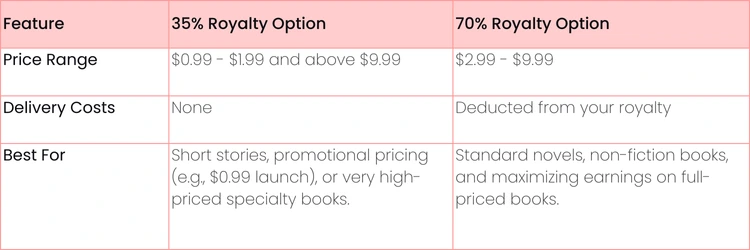
Price is more than just a number; it sends a clear signal to readers about your book's value. It also, of course, determines how much you earn. For ebooks, Amazon gives you two main royalty options, and your choice has big implications.
Let's break down the two main royalty plans for ebooks so you can see which one makes the most sense for your goals.
For most full-length books, the choice is clear. You'll want to price within the $2.99 to $9.99 sweet spot to qualify for the 70% royalty. A popular launch strategy is to start your ebook at a discount, maybe $2.99, for the first week to grab early sales and reviews. Once you have some traction, you can bump it up to its permanent price, like $4.99 or $5.99.
For your paperback, KDP automatically calculates the minimum price based on printing costs. You’ll want to price it high enough to earn a decent royalty (aim for at least $2-$4 per sale) while still being competitive with other paperbacks in your genre. Getting these details right is how you go from simply publishing a book to building a career as an author.
Amazon KDP Royalty Options at a Glance
We Need a Launch Plan. No, Really.
Hitting "Publish" on Amazon KDP without a marketing plan is like throwing a massive party and forgetting to send out invitations. You can’t just hope readers will magically find you. A great launch is all about strategy—building momentum and signaling to Amazon’s powerful algorithm that your book is a hot commodity.
This whole process kicks off long before your book ever goes live.
The pre-launch phase is where you build an audience that's actually excited to buy your book on day one. This isn't just a friendly suggestion; it's the bedrock of a killer launch. Your email list, even if it's small, is your single most valuable asset. These are people who literally raised their hand and said, "Yes, I want to hear from you."
Same goes for your author platform. Pick at least one social media channel where your ideal readers are already hanging out and start engaging. It’s your direct line to building buzz, sharing updates, and turning casual followers into genuine fans. If you’re staring at a blank screen wondering where to begin, this guide on how to build your audience for a successful launch is a fantastic starting point.
Your First 7 Days Are Everything
That first week after your book goes live? It's crunch time. A big surge of sales in this initial window screams "popular book!" to the Amazon algorithm, which can get it to show your book to way more people organically.
Here’s a rough timeline that we’ve seen work wonders for that initial push:
- Day 1 (Launch Day!): Blast the news to your email list and every social channel you have. Gently nudge your launch team or beta readers to leave those crucial early reviews.
- Days 2-3: Keep the energy up. Post reminders on social media, share screenshots of early positive reviews, and jump into the comments to chat with anyone who engages. Maybe boost a post or run a small, targeted ad.
- Days 4-5: Time for a follow-up email. Share a little behind-the-scenes story about writing the book to reconnect with your list. This is also a perfect time to schedule a discounted book promotion to kick in.
- Days 6-7: Round out the week with a big "thank you" to everyone who supported the launch. Share any cool milestones, like hitting a certain rank or nabbing a bestseller tag in a niche category. It makes your early readers feel like part of the success.
The Big Takeaway: The name of the game during launch week is sales velocity. Every single sale, every page read on Kindle Unlimited, and every new review is a vote in your favor. A concentrated burst of activity is infinitely more powerful than a slow trickle of sales spread out over a month.
Marketing Tactics for the Rest of Us
You don’t need a Hollywood budget to move the needle. A few smart, strategic moves can have a huge impact, especially right out of the gate.
One of the best bang-for-your-buck tactics for new authors is using a discounted book promotion service. Think of sites like Fussy Librarian, BookBub, or Bargain Booksy. They have enormous email lists filled with readers who are actively looking for deals. You pay a fee, drop your book's price to something irresistible (like $0.99), and they feature it in their newsletter. This one move can drive hundreds—sometimes thousands—of sales in a single day and give your book a massive visibility boost.
Firing Up Your First Amazon Ads Campaign
Amazon Ads can feel like a beast, but you don't have to tame it all at once. It's one of the best ways to get real data on what clicks with actual shoppers. The best part? You can start a campaign with as little as $5 per day.
Here’s a dead-simple way to get your first campaign running:
- Head to your KDP Dashboard and find your book. Click the "Promote and Advertise" button next to it.
- Choose "Sponsored Products" and then "Create campaign".
- For your first go, select "Automatic targeting". This is brilliant because it lets Amazon do the heavy lifting, showing your ad to shoppers based on your book's existing keywords and categories.
- Set a low daily budget (seriously, $5 is fine) and a conservative bid (try something like $0.30 per click).
- Launch it and let it cook.
Check back in a week or two. Your reports will show you exactly which search terms are leading to sales. That data is pure gold for creating more targeted, more effective campaigns down the line.
This first campaign isn’t about making a profit; it’s about learning. It’s this kind of sustained, data-driven effort that unlocks the wild earning potential of self-publishing. Think it's small potatoes? Self-published authors on KDP pocketed over $1.1 billion in royalties recently, and the Kindle Unlimited Global Fund paid out more than $575 million in 2023 alone. A smart marketing plan is your ticket to getting a piece of that action.

Common Questions About Self-Publishing on Amazon
When you’re getting close to the finish line, a few persistent questions always seem to pop up. It’s totally normal. Most authors hit these same speed bumps, especially around the nitty-gritty of cost, legal stuff, and what happens after you publish.
Let's clear the air and tackle some of the most common hurdles you might be facing.
How Much Does It Actually Cost to Self-Publish on Amazon?
While creating your KDP account and uploading your book is technically free, launching a book that looks and reads professionally is anything but. Trying to cut corners here is one of the biggest mistakes a new author can make.
Think of this as your initial business investment. To give your book a fighting chance in a ridiculously crowded market, you need to budget for the essentials.
- Professional Editing: Non-negotiable. This will be your single biggest expense, typically running from $500 to $3,000. The final price tag depends on your book's length and what kind of editing it needs (a deep developmental edit costs more than a final proofread).
- Cover Design: Your cover is your #1 marketing tool. A pro who designs for your specific genre knows how to make readers click "buy". Plan to spend between $300 and $800 for a cover that doesn't scream "amateur".
- Formatting: You can DIY with software like Vellum (a one-time purchase of around $250), or you can hire a professional formatter for $100 to $300 to handle both the ebook and paperback versions.
All in, a serious author should plan to invest somewhere between $1,000 and $4,000 to produce a book that can go toe-to-toe with anything from a major publishing house.
Do I Need an ISBN for My Book on KDP?
The short answer is: it depends on your ambitions.
For ebooks, Amazon gives you its own unique identifier called an ASIN (Amazon Standard Identification Number). So, technically, you don't need an ISBN for your Kindle version. Easy enough.
For print books, KDP will offer you a free ISBN. Sounds great, right? But there’s a catch. When you use their free ISBN, the publisher of record is listed as "Independently published" or similar, and that ISBN is locked to Amazon's platform. You can't use it anywhere else.
Actionable Insight: If you buy your own ISBNs, purchase them in a block of 10. The per-unit price drops dramatically. A single ISBN from Bowker in the US costs $125, but a pack of 10 costs $295. You will need a separate ISBN for your paperback, hardcover, and audiobook, so buying in bulk saves a significant amount of money in the long run.
How Long Does It Take for My Book to Go Live?
Once you’ve uploaded everything and hit that final "Publish" button, Amazon's review team takes over. The wait time is a little different for each format.
Ebooks are usually the fastest. You can expect your Kindle version to be live in the store within 24 to 72 hours. Sometimes it's even quicker! This makes it great for last-minute updates or quick fixes.
Print books take a bit longer. The review process is more intensive because they’re checking to make sure your files will actually print correctly. This can take up to a week. Make sure you factor this delay into your launch schedule, especially if you’re planning a big release day reveal.
Can I Make Changes to My Book After Publishing?
Yes! And honestly, this is one of the most powerful advantages of self-publishing with KDP. Found a typo a week after launch? Want to update a chapter with new information a year later? Hate your cover and want a complete rebrand? You can do it all.
You just upload the revised manuscript or cover files, and your book will go through the review process again. The changes usually go live within a few days.
If you’ve made significant changes, it’s good practice to add a note like "Second Edition, updated [Date]" in your book's description. This lets readers know they’re getting the most current version and shows you’re actively maintaining your work. This flexibility is a game-changer.
At Uplyrn, we believe that learning the right skills is the first step toward achieving your goals. Whether you're an author looking to master marketing or a professional aiming to advance your career, our platform connects you with the expert-led courses you need to succeed. Explore our diverse catalog and start your learning journey today.


Leave your thoughts here...
All Comments
Reply