









A Practical Drawing Lips Tutorial for Realistic Results
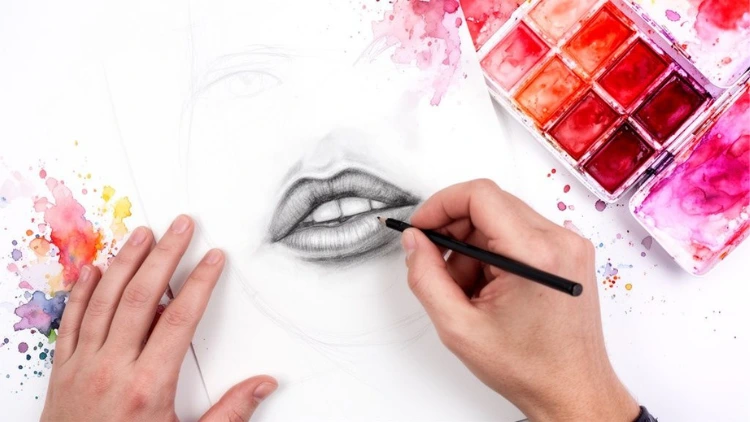
This guide breaks down how to draw lips into simple, foundational steps. The real key is learning to see them not as flat lines, but as three-dimensional forms. Get that right, and you're on your way to drawing realistic and expressive mouths.
Jump To Section

Earn As You Learn
Earn 25% commission when your network purchase Uplyrn courses or subscribe to our annual membership. It’s the best thing ever. Next to learning,
of course.
Understanding Lip Anatomy Before You Draw
Before you put a pencil to paper, you need to understand what you're actually drawing. We’ve seen so many beginners focus only on the outline, and the result is always the same: flat, "sticker-like" lips that just don't look right.
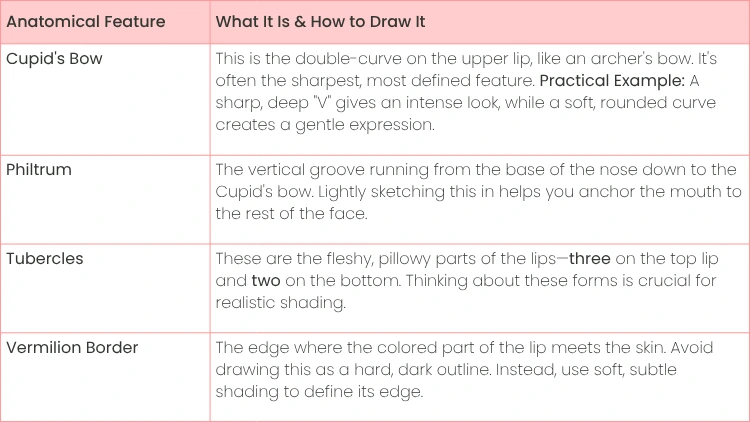
The secret to believable lips is getting a handle on their underlying structure. It’s a total game-changer. Instead of seeing one big shape, start thinking of the lips as a collection of soft, plump forms—almost like three small pillows on the top and two larger ones on the bottom. This mindset alone will help you map out highlights and shadows, giving your drawing instant volume.
Key Anatomical Landmarks
To draw lips that look convincing, you need to know a few specific landmarks. These are the features that give every mouth its unique shape and are absolutely essential for capturing a person's likeness and expression. Once you can spot them, drawing lips from any angle gets so much easier.
The Planes of the Lips
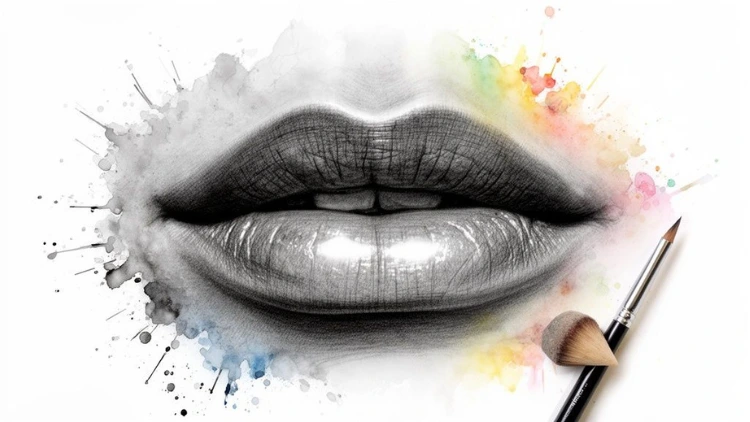
Understanding the planes of the lips is what separates amateur drawings from work that looks professional. It all comes down to how they catch the light.
As a general rule, the upper lip angles slightly inward and down. This means it catches less light and will almost always be shaded darker than the lower lip.
- Practical Example: When your light source is from above, the darkest shadow on the upper lip will be right above the parting line, while the lower lip will be brightest on its fullest, forward-facing curve.
The lower lip, on the other hand, faces outward and catches more light. This is where you’ll typically place a bright highlight to show its fullest point. At the same time, the corners of the mouth recede back into the cheeks, creating deep shadows that add a ton of depth.
Nailing these core concepts is foundational for all portraiture. If you want to build a really solid base for all your facial drawings, you can dive deeper with this guide on the essential techniques for portrait sketching.
Let's quickly go over the essential anatomical parts that will make your drawings more accurate and three-dimensional.
Key Lip Anatomy for Artists
Learning to see these features will fundamentally change how you approach drawing lips.
- Actionable Insight: Don't just draw the outline. Seriously. Lightly sketch in those five "pillow" shapes—three on top, two on the bottom. This forces you to create volume from the start and makes placing your shadows and highlights way more intuitive later on.
Constructing Lips From The Front View
Alright, you've got the anatomy basics down. Now it's time to put pencil to paper and actually start drawing. This is where we turn that theory into a simple, repeatable process for drawing lips from the front.
Forget trying to draw the perfect outline right from the start. That's a recipe for frustration. The real key is to begin with loose, simple guidelines that map out the placement and proportions before you commit to any solid lines. This approach keeps your drawing flexible and makes fixing mistakes a breeze.
Starting With Simple Guidelines
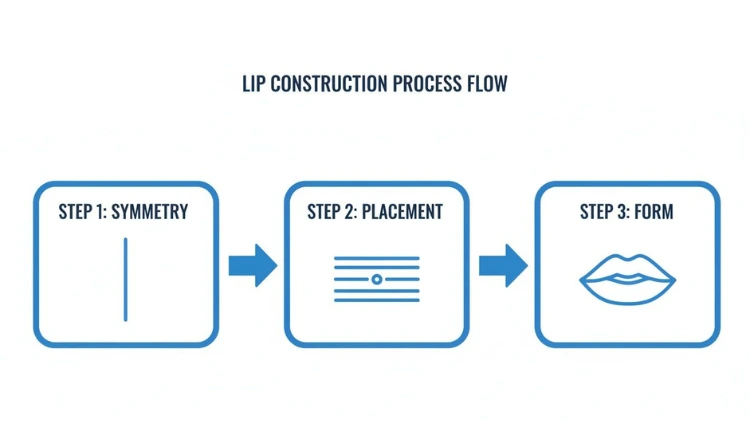
The very first thing to do for any front-view mouth is lock down its placement and symmetry. A few light lines are all you need to build a reliable scaffold for your drawing. This takes seconds but saves you from the headache of lopsided lips later on.
Always start with two simple guides:
- A vertical line: This single line runs right down the center of where the mouth will go. It's your anchor, ensuring both sides are symmetrical.
- Practical Example: Use this line to ensure the peak of the Cupid's bow is the same distance from the center on both sides.
- Three horizontal lines: One for the parting line where the lips meet, one for the highest point of the upper lip, and a final one for the bottom curve of the lower lip.
- Actionable Insight: Want fuller lips? Increase the distance between the top and bottom horizontal lines. For thinner lips, bring them closer together.
With this simple framework in place, you’re ready to start blocking things in.
Blocking In The Main Forms
Using your guidelines as a map, lightly sketch in the main shapes. Don't think about hard outlines yet. Just focus on simple curves and volumes. The Cupid's bow is your most critical landmark on the top lip; its shape defines the whole character of the mouth. A sharp, deep "V" gives a totally different feel than a soft, rounded curve.
Next, move to the bottom lip. Its curve often mirrors the Cupid's bow, just in reverse, which helps create a nice, natural harmony. The bottom lip is usually a bit fuller and rounder, so make sure the shape you draw hints at that volume. You should be able to see those "pillow" forms we talked about starting to take shape.
- Actionable Insight: Tiny tweaks to these initial shapes can completely change the expression. A slight upward curve at the corners of the mouth can suggest a faint smile, while a downward turn can imply sadness. Play around with these curves—you'll be amazed at how much emotional weight they carry.
Blending the Corners Naturally
One of the most common mistakes students make is drawing lips that look "pasted on" the face. This usually happens when the corners of the mouth end in sharp, abrupt points. Real lips don't do that. They're soft and blend seamlessly into the skin and muscles of the cheeks.
- Practical Example: To get this right, never end your lines with a hard stop. Instead, let the lines at the corners fade out gently. Use the side of your pencil to add a soft shadow where the lips meet the cheeks, suggesting they are receding into the face. It's a small detail, but it makes a massive difference in realism.
This front-view method is the foundation you’ll use for every other angle, so it's worth mastering.
Drawing Lips In Profile And Three-Quarter Views
Alright, you've nailed the front view. Now for the fun part. Let's bring your portraits to life by turning the head and tackling lips from different angles. It’s a move that instantly adds dynamism, but it also brings a few new things to think about. We'll walk through how to handle both profile and three-quarter views.
Drawing lips from the side—the profile view—can feel a little strange at first. The secret isn't in drawing two separate lips, but in seeing their relationship. Here's a simple mental trick for this: the "stair-step".
- Actionable Insight: Imagine a tiny step. The top lip juts out a bit, creating the top of the step. The bottom lip is then tucked slightly underneath it. This little visualization completely stops the lips from looking flat or stacked right on top of each other, which is a super common mistake.
When blocking it in, think of the overall shape as a soft, slanted ‘M’ or even a subtle beak. This helps you get that forward push of the upper lip and the gentle curve of the lower one right from the very start.
Mastering The Three-Quarter View
The three-quarter view is where many artists get stuck, but it's also where your drawings can gain incredible depth. The one concept you absolutely have to understand here is foreshortening. It's just a fancy word for how things look shorter or squished when they're angled toward you.
When drawing lips in a three-quarter view, the side of the mouth closer to the viewer will look fuller and take up more space. The side turning away from the viewer, however, will seem compressed and much narrower. You're no longer drawing a flat shape; you're sculpting a form that wraps around the curve of the face.
Pro Tip: The most important line in a three-quarter view is the parting line where the lips meet. It’s no longer straight—it’s a definite curve. This line has to follow the contour of the face as it wraps around the teeth. The curve will be most dramatic on the far side of the mouth, selling the illusion of the head turning away.
Adjusting The Lip Landmarks
Foreshortening changes all those familiar landmarks we learned in the front view. That distinct, sharp Cupid's bow? It flattens out into a much gentler, wavy line. The "V" shape gets softened as one side starts to recede.
Here's a practical breakdown of the key adjustments:
- The Closer Side: All the forms—the tubercles, the curves—are more pronounced here. This is where your highlights will pop, really showing off the volume.
- The Farther Side: Forms get squished. The corner of the mouth might even tuck away and become almost invisible, defined more by a bit of shadow than a hard outline.
- The Parting Line: This line is your best friend. Its curve is what sells the perspective.
- Practical Example: Start the parting line with a deep curve on the far side, have it flatten out as it crosses the center of the mouth, and then end in a much shallower curve on the side closer to the viewer.
These same principles apply to every feature on the face. To keep the momentum going, check out this guide on how to draw a realistic nose in 4 simple steps, where you'll see these exact concepts of foreshortening and perspective at play. Once you get a feel for these angles, you’ll have the confidence to draw a face from any direction, adding a whole new level of realism to your work.
This process of using simple guides for symmetry and placement gives you a rock-solid foundation before you commit to the final lines.
Bringing Your Drawing to Life With Shading And Texture
You've nailed the outline, but that's just the blueprint. Shading and texture are what breathe life into your drawing, transforming a flat sketch into lips that look soft, full, and convincingly real. This is where we move past simple lines and start sculpting with light and shadow.
Before your pencil even touches the paper, stop and decide on your light source. Is the light coming from above? From the side? This single choice will dictate where every shadow and highlight falls.
As a general rule to always follow, the upper lip is almost always darker than the bottom one. It just naturally angles inward, away from the light, while the fuller bottom lip faces outward, catching the light perfectly.
This simple observation about light and form is a cornerstone of creating realistic art. If you want to really strengthen your artistic intuition, diving into the core elements of art and principles of design will give you a massive advantage.
Mapping Values for a 3D Effect
To get started, lightly sketch out the basic areas of light and shadow. The key here is to use a very light touch. You’re just creating a value map, not committing to final tones yet.
- Darkest Values: Always start with the corners of the mouth and the parting line where the lips meet. These are your anchors of shadow and will immediately create a sense of depth.
- Mid-Tones: The entire upper lip and the lower, receding plane of the bottom lip will generally fall into your mid-tone range.
- Highlights: The fullest, most prominent part of the bottom lip is where the light hits directly. Make a mental note to leave this area nearly white for now.
Actionable Insight: Want that soft, fleshy look? Shade with the side of your pencil lead in small, circular motions instead of using the sharp tip. This builds up tone smoothly without creating harsh, scratchy lines. Once you have some graphite down, grab a blending stump or even a simple Q-tip to gently smudge the tones together for a seamless gradient.
Creating Realistic Lip Finishes
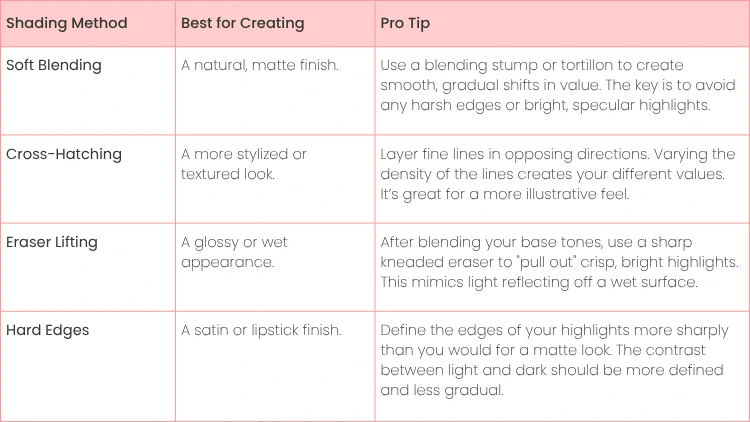
Not all lips are the same. Some are matte and natural, others are covered in high-shine gloss. How you shade determines the final finish. Understanding the different approaches is crucial for getting the effect you want.
Creating Subtle Lip Texture
Real lips are not perfectly smooth; they're covered in tiny creases and wrinkles that give them their unique texture. The goal is to suggest these details without overdoing it and making the lips look chapped. The trick is to use delicate, curved lines that wrap around the form of the lips.
- Practical Example: For this step, switch to a harder, sharper pencil like a 2H or a good mechanical pencil. Lightly draw thin, curved lines radiating outward from the center parting line. The secret to making it look natural is randomness—vary the length, pressure, and spacing of the lines. Whatever you do, avoid drawing straight, parallel lines; it's the fastest way to make your drawing look flat and unnatural.
Thinking about texture and highlights on lips often reminds us of makeup artistry. The way makeup artists contour and highlight to create a certain look can provide amazing insights for drawing. In fact, many principles for achieving flawless makeup in photos directly translate to the shading techniques we use as artists.
Adding Those Final "Wet" Highlights
That final pop of realism often comes from a single, well-placed highlight. This is what sells the illusion of moisture. Once all your shading and blending are done, it's time to bring out the highlights.
- Actionable Insight: Take a kneaded eraser sharpened to a point, or even better, the tiny tip of a Tombow Mono Zero eraser, and use it like a pencil to "draw" the light back into your image.
Firmly press and lift the eraser on the fullest part of the lower lip to create a bright highlight. For an extra touch of realism, add a very thin, bright line right along the upper edge of the Cupid's bow and the bottom edge of the lower lip. This tiny detail suggests light catching a moist edge and can instantly elevate your drawing.
Here’s a breakdown of the go-to methods for different lip finishes.
Shading Approaches for Different Lip Finishes
Each technique gives a completely different character to the lips. Experiment with all of them to see how they feel and which ones you prefer for different styles.
Common Lip Drawing Mistakes and How to Fix Them
Even when you know all the right steps, it’s incredibly easy to fall into a few common traps when drawing lips. We’ve all been there—staring at a drawing that just feels… off. Think of this section as your personal troubleshooting guide for spotting those pesky issues and, more importantly, fixing them for good.
The goal isn't just to point out what’s wrong. It's to give you clear, actionable ways to self-correct. Once you learn to see these problems in your own work, your skills will start to improve much, much faster.
The Problem With Sausage Lips
One of the first hurdles every artist faces is drawing "sausage lips". This is when the top and bottom lips look like two simple, rounded tubes without any definition. It happens when you forget about the underlying forms and tubercles we talked about earlier.
- Practical Fix: Real lips aren't just smooth cylinders. They have distinct peaks, valleys, and curves that give them their unique shape. The fix is to start thinking in planes again. Remember that the top lip has five subtle planes, while the bottom lip has those two full, rounded forms. Make a point to define the dip in the Cupid's bow and add small shadows between the tubercles. This instantly breaks up that monotonous tube shape and adds believable dimension.
Avoiding The Sticker Outline Effect
Here's another classic mistake we see all the time: drawing a hard, dark outline around the entire mouth. This makes the lips look like a sticker that’s been slapped onto the face, completely separating them from the rest of the features.
In reality, the edge where the lip meets the skin—the vermilion border—is defined by a subtle shift in color and value, not a stark black line. So, how do we fix this? Use value, not lines. Shade the skin just a tiny bit darker right under the bottom lip to create a soft cast shadow. For the top lip, that edge should be defined by the contrast between the darker tone of the lip itself and the lighter skin above it.
- Actionable Fix: Ditch the hard outline completely. Grab the side of your pencil and use soft, gradual value changes where the lip meets the skin. This one change will make the lips feel like they belong on the face, not just sitting on top of it.
Correcting Flat, Lifeless Shading
Do your lips still look flat even after you've shaded them? You're probably not using a wide enough range of values. This is a common trap for artists who stick to just one or two shades of gray, which completely kills the 3D illusion you worked so hard to build.
- Practical Fix: The solution is to be bold with your core shadows and highlights. The upper lip is almost always in shadow, the corners of the mouth are your darkest darks, and the lower lip catches a bright highlight.
- Actionable Insight: Place a piece of paper next to your drawing. On it, create a value scale by making five boxes. Shade the first pure black (your darkest shadow), leave the last one pure white (your highlight), and fill the ones in between with distinct shades of gray. Now, make sure your drawing uses every one of those five values. This exercise forces you to push your contrast.
Pushing the contrast between these key areas is what makes lips pop off the page. If you're looking for more ways to make your figures feel dynamic, check out these 10 sketching tips for character design.
Your Questions on Drawing Lips Answered
Alright, let's dive into some of the questions we hear all the time from artists trying to master drawing lips. Think of this as your go-to cheat sheet for fixing those nagging issues and giving your art that final, polished look. These are the tips we’ve picked up over the years that really make a difference.
What Pencils Are Best for Lip Texture
Getting that believable lip texture really comes down to having the right tools for the job. Never stick to just one pencil; instead, use a specific range to build up the effect gradually.
- Soft skin and base tones: Always start with a light pencil, usually a 2H or an H. This lets you map out the values and build up soft layers without carving dark lines into the paper too early.
- Deep shadows and corners: For the corners of the mouth or the dark line where the lips meet, a 2B or 4B is the go-to. It gives you that rich, deep value you need for creating depth, and you don’t have to press down hard to get it.
- Fine details and highlights: A sharp mechanical pencil is perfect for adding those tiny creases. But the real magic for highlights comes from a kneaded eraser. Use it to lift off graphite and create soft, diffused highlights that look much more natural than just leaving the paper white.
How Do I Draw a Smile Without It Looking Unnatural
This is a classic problem. So many artists just stretch the mouth wider, and the result is always a bit creepy or fake. A real smile is a full-face workout; it involves way more than just the lips.
The secret is to focus on how the smile muscles pull the corners of the mouth up and back, not just sideways. This push-and-pull action makes the cheeks bunch up, which is what creates those nasolabial folds (what most people call "smile lines"). You'll also notice the lips themselves get thinner and compress as they stretch. Showing this tension is what sells the expression as genuine.
- Actionable Insight: Pull up some reference photos of people genuinely laughing or smiling. Notice how the skin around the mouth creases? See how the bottom eyelids often push up a little? Sketching these surrounding details, even with just a few subtle lines, is the key to a smile that feels real and full of life.
My Lips Always Look Flat What Am I Doing Wrong
This is a shading problem. If your lips look like a flat sticker on the face, you're probably not using a wide enough range of values to show their form. Lips are round, soft, three-dimensional forms, and you have to use light and shadow to sculpt them.
To fix this, start thinking like a sculptor.
- The lower lip almost always catches more light from above, so it needs a bright highlight. This is followed by mid-tones and then a dark core shadow just before the lip turns under.
- The upper lip is usually darker overall because it angles downward, away from the light source. It has at least five small planes that you can suggest with subtle shifts in value.
Actionable Insight: Making that mental shift from "coloring in a shape" to "sculpting form with light" is the single fastest way to get your lips to pop off the page. As a practical exercise, try drawing a simple sphere and shading it. Apply the exact same logic of highlight, mid-tone, core shadow, and reflected light to the "pillow" shapes of the lips.
Ready to take your art to the next level? Start your creative journey with us today.


Leave your thoughts here...
All Comments
Reply